

Microsoft 365 Double Key Encryption: Complete Setup Guide
Table of Contents
- What Is Double Key Encryption and Why It Matters
- DKE vs Customer Key: Understanding Your Options
- Prerequisites and Infrastructure Requirements
- Step-by-Step DKE Deployment Walkthrough
- Configuring Sensitivity Labels for DKE
- User Experience and Productivity Considerations
- Troubleshooting Common DKE Implementation Issues
- Maintaining Compliance with DKE in Production
- Conclusion
- References and Further Reading
Enterprises migrating sensitive workloads to Microsoft 365 face a persistent dilemma: how do you maintain genuine control over your data when the encryption keys reside with your cloud provider? Double Key Encryption Microsoft 365 addresses this challenge directly by splitting cryptographic control between Microsoft and your organisation, ensuring that no single party—including Microsoft—can access your protected content. For regulated industries under GDPR, NIS2, DORA, or FINMA requirements, this architecture represents a practical path to M365 data sovereignty without abandoning the productivity benefits of cloud collaboration.
This guide provides a complete technical walkthrough for deploying DKE in production environments. We cover infrastructure requirements, step-by-step deployment procedures, sensitivity labels encryption configuration, and the operational realities of maintaining compliance at scale. Whether you are a CISO evaluating encryption options or a cloud security architect tasked with implementation, this resource delivers the technical depth required to make informed decisions and execute successfully.
What Is Double Key Encryption and Why It Matters
Double Key Encryption (DKE) is a Microsoft Purview Information Protection capability that applies two layers of encryption to protected content. The first key is managed by Microsoft within the Azure Rights Management service. The second key is hosted and controlled exclusively by your organisation—either on-premises or through a trusted third-party key management provider.
The Technical Architecture
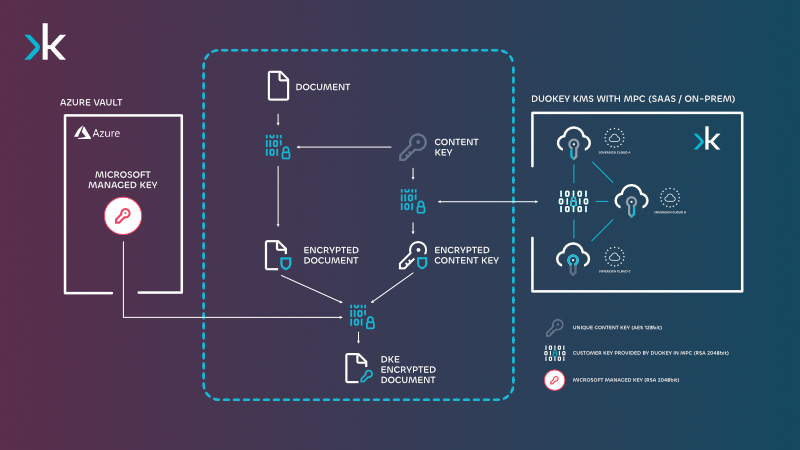
DuoKey DKE architecture — the document is encrypted first with your customer key held in DuoKey KMS MPC, then again with the Microsoft-managed Azure key. Both are required to decrypt.
When a user protects a document with DKE:
- The content is encrypted using your organisation's key (retrieved from your DKE service endpoint)
- The already-encrypted content is then encrypted again using Microsoft's Azure RMS key
- Both keys are required to decrypt and access the content
This dual-encryption model creates a cryptographic barrier that prevents any single entity from accessing protected data. Microsoft cannot decrypt content without your key. Your organisation cannot decrypt content without Microsoft's key. Even if one key is compromised, the content remains protected.
Why Data Sovereignty Demands This Approach
Standard Microsoft 365 encryption—whether using Microsoft-managed keys or Customer Key—still permits Microsoft to technically access your content during certain operations. For organisations subject to strict regulatory frameworks, this creates a compliance gap.
Consider the regulatory landscape facing European enterprises:
| Regulation | Encryption Requirement | DKE Relevance |
|---|---|---|
| GDPR Article 32 | Appropriate technical measures including encryption | DKE provides defence against cloud provider access |
| NIS2 Article 21 | Cryptographic controls and key management | Mandates control over encryption mechanisms |
| DORA Article 28 | ICT third-party risk management | Reduces dependency on single cloud provider |
| FINMA Circular 2018/3 | Data confidentiality in outsourcing | Swiss banks require proof of provider-exclusion |
DKE addresses the fundamental question regulators increasingly ask: "Can your cloud provider access this data?" With DKE properly deployed, the answer is definitively no.
The Business Case Beyond Compliance
Beyond regulatory requirements, DKE serves strategic security objectives:
- Insider threat mitigation: Even compromised Microsoft administrator accounts cannot access DKE-protected content
- Jurisdictional control: Your key remains within your chosen geography, regardless of where Microsoft processes data
- Audit defensibility: Clear cryptographic separation demonstrates due diligence to auditors and customers
- Contract leverage: Proves to customers and partners that you maintain exclusive control over their data
DKE vs Customer Key: Understanding Your Options
Microsoft offers multiple encryption options within Microsoft 365. Understanding the distinctions is essential for selecting the appropriate solution.
Microsoft-Managed Keys (Default)
Microsoft controls all encryption keys. Content is encrypted at rest, but Microsoft retains technical access capability. Suitable for general business data without elevated regulatory requirements.
Customer Key (Microsoft 365 BYOK)
Your organisation provides root keys that Microsoft uses to generate encryption keys. These keys are stored in Azure Key Vault under your tenant. Microsoft retains access to a Microsoft-managed "availability key" for data recovery scenarios.
Critical limitation: Microsoft can still technically decrypt data using the availability key, which they control. This fails to satisfy requirements demanding complete provider exclusion.
Double Key Encryption
Your organisation hosts and controls one of the two required decryption keys entirely outside Microsoft infrastructure. Microsoft possesses no technical capability to access protected content.
Feature Comparison Matrix
| Capability | Microsoft-Managed | Customer Key | DKE |
|---|---|---|---|
| Microsoft can access content | Yes | Yes (via availability key) | No |
| Key rotation control | Microsoft | Shared | Full customer control |
| Supported content types | All M365 | Exchange, SharePoint, Teams | Files in Office apps |
| Search and eDiscovery | Full | Full | Limited |
| Co-authoring support | Full | Full | No |
| Mobile support | Full | Full | Limited |
| Implementation complexity | None | Medium | High |
| Meets GDPR "provider exclusion" | No | Partial | Yes |
When to Choose DKE
DKE is appropriate when:
- Regulations explicitly require demonstrating that cloud providers cannot access data
- Content is highly classified (trade secrets, M&A documents, legal privilege)
- Customers or partners contractually require provider-exclusion guarantees
- Your threat model includes nation-state actors with potential legal compulsion over Microsoft
DKE is not appropriate for:
- Everyday business documents requiring collaboration features
- Content that must be searchable via Microsoft compliance tools
- Organisations without infrastructure to host key services reliably
Most enterprises deploy DKE alongside Customer Key, using DKE for the most sensitive content categories while Customer Key protects broader data sets.
Prerequisites and Infrastructure Requirements
Successful DKE deployment requires specific licensing, infrastructure, and identity configurations. Address these requirements before beginning implementation.
Licensing Requirements
DKE requires Microsoft 365 E5 licensing or one of the following add-ons:
- Microsoft 365 E5 Compliance
- Microsoft 365 E5 Information Protection and Governance
- Office 365 E5
Users who will protect content with DKE and users who will consume DKE-protected content both require appropriate licensing.
Azure Infrastructure
Azure Active Directory (Entra ID):
- Tenant must be configured for Azure RMS
- Users must be synchronised if using hybrid identity
App Registration:
- DKE service requires an Azure AD app registration
- Configure appropriate API permissions for Azure Rights Management Services
DKE Key Service Infrastructure
Your DKE key service can be deployed in multiple configurations:
Option 1: On-Premises Deployment
- Windows Server 2019 or later
- .NET Core 3.1 runtime or later
- IIS with HTTPS certificate
- Network accessibility from Microsoft cloud services
Option 2: Azure-Hosted Deployment
- Azure App Service (recommended for availability)
- Azure Key Vault for key storage
- Virtual Network integration for security
Option 3: Third-Party Key Management Provider
- Managed DKE service from vendors like DuoKey
- Eliminates infrastructure overhead
- Provides geographic key residency guarantees
- Includes HSM-grade key protection and audit logging
Network Requirements
The DKE service endpoint must be:
- Accessible over HTTPS (TLS 1.2 minimum)
- Reachable from Microsoft cloud services for key retrieval during content access
- Protected by appropriate network security controls
Required firewall rules:
| Direction | Source | Destination | Port | Protocol |
|---|---|---|---|---|
| Inbound | Microsoft RMS services | DKE endpoint | 443 | HTTPS |
| Inbound | Client applications | DKE endpoint | 443 | HTTPS |
Client Software Requirements
- Microsoft 365 Apps for Enterprise (version 2009 or later)
- Windows 10 version 1809 or later, or Windows 11
- Azure Information Protection unified labelling client (optional, for File Explorer integration)
macOS support requires Microsoft 365 Apps version 16.40 or later. Mobile clients have limited DKE support—evaluate your workforce's device composition before proceeding.
Identity and Access Prerequisites
- Users must authenticate via Azure AD to access DKE-protected content
- Conditional Access policies should not block access to the DKE service endpoint
- Multi-factor authentication is recommended but must be configured to avoid disrupting key retrieval flows
Step-by-Step DKE Deployment Walkthrough
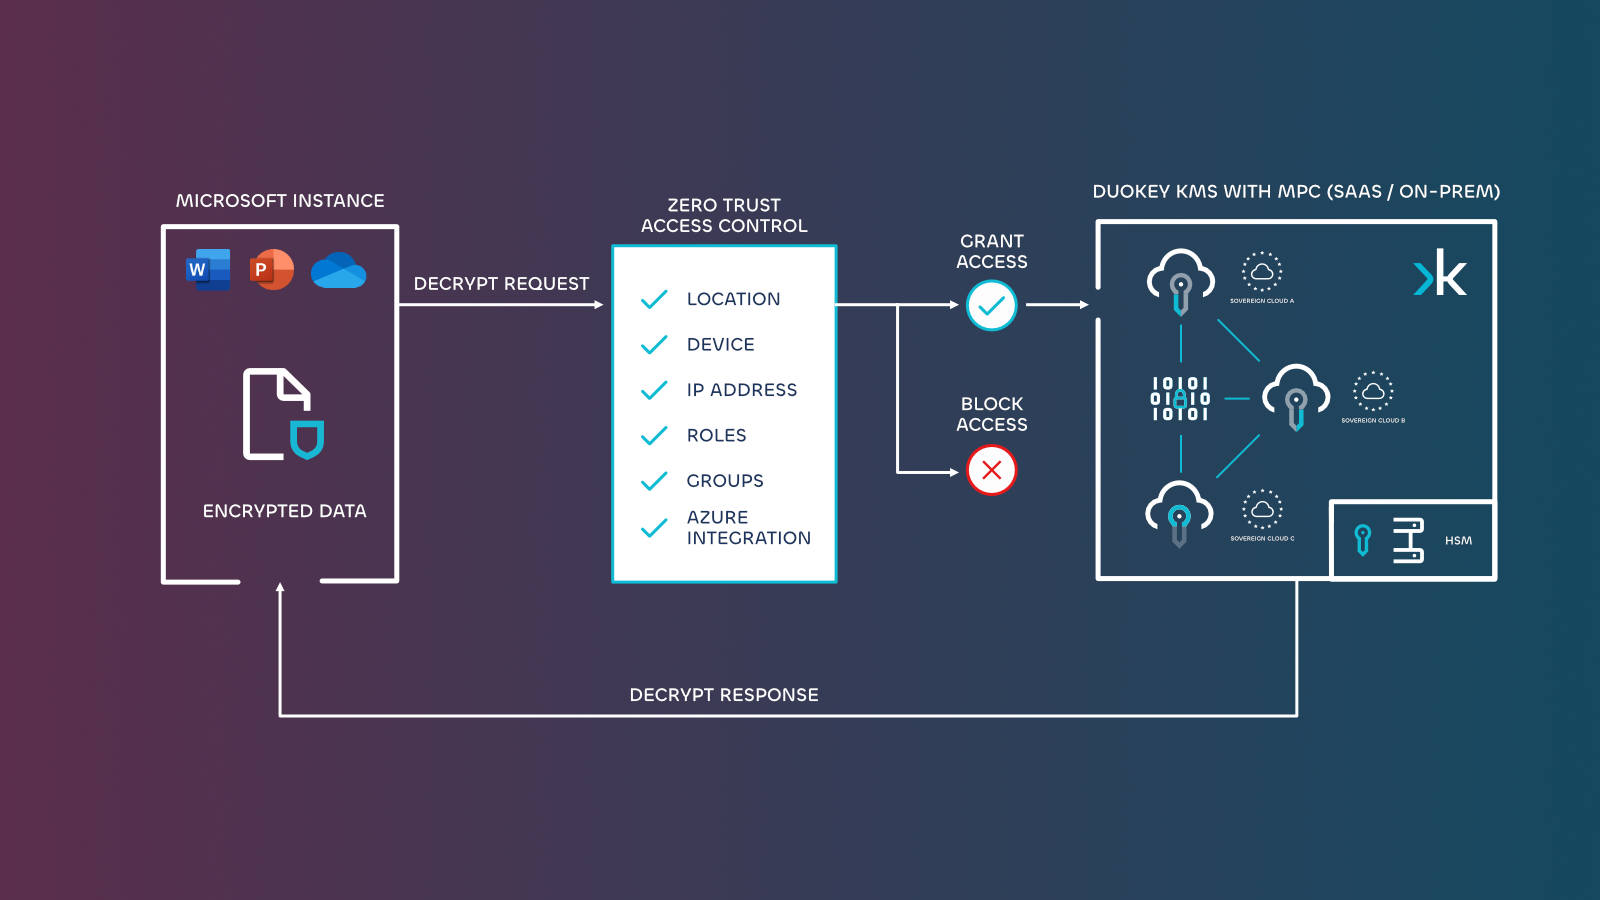
DuoKey applies Zero Trust access controls (location, device, roles, groups, Azure integration) before serving the customer key during a decrypt request.
This section provides a technical walkthrough for deploying the DKE key service and integrating it with Microsoft Purview.
Step 1: Download and Prepare the DKE Service
Microsoft provides a reference implementation for the DKE service on GitHub.
git clone https://github.com/Azure-Samples/DoubleKeyEncryptionService.git
Navigate to the src/customer-key-store directory. This contains the .NET Core application that will serve as your key service.
Step 2: Generate Your Encryption Keys
Generate RSA key pairs for your DKE service. For production deployments, use HSM-protected keys.
Create a key generation configuration file (appsettings.json):
{
  "KeyStoreType": "File",
  "KeyStorePath": "./keys",
  "Keys": [
    {
      "Name": "DKEKey1",
      "Id": "your-unique-key-id-1",
      "KeyType": "RSA",
      "KeySize": 2048
    }
  ]
}
For production environments, replace the file-based key store with Azure Key Vault or an external key management system that provides HSM protection and comprehensive audit logging.
Step 3: Register the DKE Application in Azure AD
-
Navigate to Azure Portal > Azure Active Directory > App Registrations
-
Select "New registration"
-
Configure the application:
- Name:
DKE Key Service - Supported account types: Accounts in this organizational directory only
- Redirect URI: Leave blank (not required for this service)
- Name:
-
After creation, note the Application (client) ID and Directory (tenant) ID
-
Configure API permissions:
- Add
Azure Rights Management Services>Content.SuperUser - Grant admin consent for your organisation
- Add
-
Create a client secret or configure certificate authentication (certificates recommended for production)
Step 4: Configure the DKE Service
Update the DKE service configuration with your Azure AD details:
{
  "AzureAd": {
    "Instance": "https://login.microsoftonline.com/",
    "TenantId": "your-tenant-id",
    "ClientId": "your-app-client-id",
    "ClientSecret": "your-client-secret"
  },
  "KeyStore": {
    "Type": "AzureKeyVault",
    "VaultUri": "https://your-vault.vault.azure.net/"
  },
  "ServiceSettings": {
    "PublicKeyEndpoint": "https://dke.yourcompany.com/keys"
  }
}
Step 5: Deploy the DKE Service
For Azure App Service deployment:
- Create a new Azure App Service (Windows or Linux)
- Configure HTTPS with a valid TLS certificate
- Deploy the DKE application code
- Configure application settings from your
appsettings.json - Enable authentication via Azure AD
For on-premises IIS deployment:
- Install .NET Core hosting bundle on Windows Server
- Create an IIS website with HTTPS binding
- Deploy the published DKE application
- Configure the application pool for .NET CLR version: No Managed Code
- Verify the site is accessible at your intended URL
Step 6: Verify the DKE Service Endpoint
Test that your DKE service responds correctly:
GET https://dke.yourcompany.com/keys/DKEKey1
Expected response includes the public key in JWK format:
{
  "key": {
    "kty": "RSA",
    "n": "base64-encoded-modulus",
    "e": "AQAB",
    "kid": "DKEKey1"
  }
}
Step 7: Register the DKE Key URL with Microsoft Purview
- Navigate to Microsoft Purview compliance portal
- Go to Information Protection > Labels
- You will reference the DKE key URL when creating sensitivity labels in the next section
At this point, your DKE infrastructure is operational and ready for sensitivity label integration.
Configuring Sensitivity Labels for DKE
Sensitivity labels encryption with DKE requires specific configuration in Microsoft Purview. This section covers label creation and policy deployment.
Creating a DKE-Enabled Sensitivity Label
-
Open the Microsoft Purview compliance portal
-
Navigate to Information Protection > Labels
-
Select Create a label
-
Configure basic label settings:
- Name:
Highly Confidential - DKE Protected - Display name:
DKE Protected - Description for users: "Apply this label to documents requiring maximum protection. Content cannot be accessed by Microsoft."
- Name:
-
Define the label scope:
- Select Files & emails
- Items can also include meetings if required
-
Configure encryption settings:
- Select Apply encryption
- Choose Double Key Encryption
- Enter your DKE key URL:
https://dke.yourcompany.com/keys/DKEKey1
-
Configure access permissions:
- Assign permissions to specific users, groups, or your entire organisation
- Set appropriate permission levels (Viewer, Reviewer, Co-Author, Co-Owner)
-
Configure content expiration and offline access:
- Consider business requirements for offline document access
- Note that DKE requires key service connectivity for decryption
-
Configure content marking:
- Add headers, footers, or watermarks to identify protected content
- Consider including "DKE Protected" indicators for user awareness
-
Review and create the label
Publishing the Sensitivity Label
Labels must be published via a label policy to become available to users:
- Navigate to Information Protection > Label policies
- Select Publish label
- Choose your DKE-enabled label(s)
- Select target users and groups (start with a pilot group)
- Configure policy settings:
- Require justification for label removal
- Require users to apply a label (optional)
- Name and create the policy
Label policies can take up to 24 hours to propagate to all users. Plan pilot testing accordingly.
Label Configuration Best Practices
| Configuration | Recommendation | Rationale |
|---|---|---|
| Label visibility | Limit to users with genuine need | Reduces confusion and support burden |
| Sub-labels | Use parent/child hierarchy | "Highly Confidential" > " |